Setup Inkscape in Windows and Ubuntu
Inkscape software is easy to install in both Windows and Ubuntu. However it is a little difficult for beginners to figure out how to customize the software. This article discusses the steps to customize Inkscape in both Windows and Ubuntu.
Windows Setup
Inkscape official website has a portable version. You can download a 7-zip file from this official download page. Click the third download button under text “Binary archive in 7zip format (64bit)” to down a .7z file. A free utility software 7-zip is able to extract .7z file into a directory. The 7-zip software also has a portable version if you do not want to install it.
After the file is extracted into this directory, double clicking
inkscape.exe starts Inkscape.
C:\Users\Username\Documents\inkscape0.92.4
Inkscape User Extension Directory
In Inkscape, click menu item Edit > Preferences to open preference
dialog (Ctrl + Shift + p). Choose System on the left, and the right side
shows system paths for variables. The default value
for User extensions is,
C:\Users\Username\AppData\Roaming\inkscape\extensions
Open this location in File Explorer and copy and paste extension files
(.py and .inx) into the directory. The extension program will show up
under Extensions top level menu next time Inkscape is started. Or you
can change the location to a different directory.
Fonts
There are two ways to customize fonts in Inkscape.
The first one is to drop font files into C:\Windows\Fonts directory.
The fonts become accessible to all Windows programs. You can find
and download .ttf font files online (such as popular Roboto fonts).
The second way is to create a new fonts directory at the location
where inkscape.exe is stored, and copy files into
this directory. Open file \etc\fonts\conf.d\50-user.conf and add
a line <dir>./fonts</dir> before the last line. Check the new fonts
on Text and Font dialog in Inkscape.
...
<dir>./fonts</dir>
</fontconfig>
Install Dependencies for Plugin WriteTex
WriteTex is a nice Inkscape extension for adding LaTeX equations onto a drawing. Other options are available, but WriteTex is simple and reliable.
This extension requires LaTeX system and pdf2svg program installed. WriteTex calls LaTeX system to generate a PDF file, and calls pdf2svg to convert PDF to an SVG file. Then it loads the SVG onto Inkscape drawing.
The WriteTex plugin files writetex.inx and writetex.py are
available on
this github page. Download
those two files and drop them into User extension directory.
You can download a texlive ISO file from
this web page.
Use 7-zip to extract the ISO file into a directory. Double click
install-tl-advanced.bat to run advanced installation.
You may choose portable version and install LaTeX system into
a directory.
Program pdf2svg can be downloaded from this github address
Suppose texlive and pdf2svg-x64 directories are stored in this location,
C:\Users\Username\Downloads\WriteTex-dep
Two directories containing files xelatex.exe and pdf2svg.exe should be
added to the system path. In Windows 10 File Explorer, right click This PC and
choose Properties. Choose Advanced system settings and click Advanced
tab on the dialog. Click Environment Variables button and Path variable.
Then click Edit and add two directories to the list.
C:\Users\Username\Downloads\WriteTex-dep\pdf2svg-x64
C:\Users\Username\Downloads\WriteTex-dep\texlive\bin\win32
The purpose of above steps is for WriteTex python extension to find
xelatex.exe and pdf2svg.exe programs.
How to Enter Equations with Plugin WriteTex
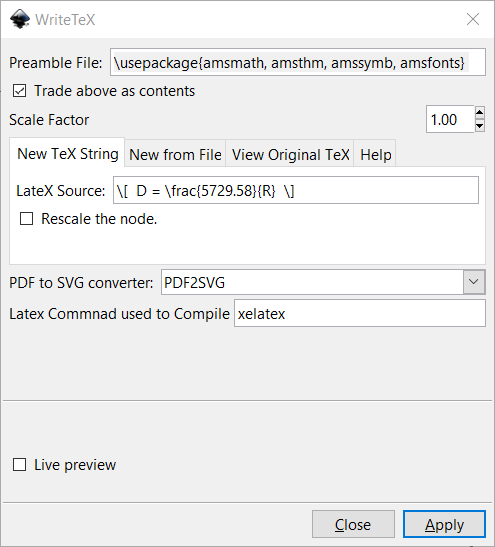
Enter equations between \[ and \] in LaTeX Source box and click Apply.
Some LaTeX symbols like \dfrac need AmsTeX. Add the line below to
Preamble File box and toggle box Trade above as contents.
\usepackage{amsmath, amsthm, amssymb, amsfonts}
The third tab View Original TeX on the dialog enables you to view texts
of equations. Choose an equation in Inkscape and click Apply button.
A dialog will pop up showing equation input.
Ubuntu Setup
In Ubuntu 18.04, bash command sudo apt install inkscape installs Inkscape.
If you want the latest stable version,
this web page
provides more information. You add a ppa repository first and then
type the same bash command to install.
To add fonts in Ubuntu, you create a .fonts subdirectory in the home directory and drop font files into it. The fonts will become available in Inkscape.
WriteTex in Ubuntu
The steps to add Inkscape extension in Ubuntu 18.04 are the same as in Windows. However it is easier to install dependencies for WriteTex. The two commands below install the texlive and pdf2svg programs. The programs are automatically added to the system path.
sudo apt-get install texlive
sudo apt-get install pdf2svg
The texlive installation does not include xelatex. You change xelatex
to pdflatex on the WriteTex dialog to make it work.
Other Comments
It seems that the Windows Inkscape is more stable than the Ubuntu version. I have several svg files that crash Inkscape in Ubuntu but work fine in Windows version.
One time I was really frustrated by constant Inkscape crashes in Ubuntu. I checked the SVG file line by line and found that one drawing element had wrong XML format. It somehow slipped into the drawing file. Once the element was removed, the SVG file worked fine. The lesson learned was that when an SVG file contains corrupted XML code, Inkscape may crash without giving error messages.
Update on 11/2/2020
I am working on a drawing in Inkscape (Windows) today and I cannot save the file as pdf. The Inkscape simply pops up a dialog saying “internal error” and exits. I copy the file to a Linux Mint computer and I can save the file as pdf, but the generated pdf file does not have the background image. It turns out that I used the clip (menu Object > Clip > Set) function to crop out the image. Once I remove the clip, the file saves to pdf fine.
The lesson is that it is better to use GIMP or other application to crop out background image. The clip function in Inkscape is not so reliable.
Update on 1/27/2021
The Linux Mint software repo has Inkscape version 0.92.3. Some Inkscape
shortcuts are intercepted by Linux Mint. For example, the shortcuts
Alt + Right Arrow or Alt + Left Arrow do not work. In Inkscape,
they are shortcuts for moving object by 1 pixel (or 2 pixels).
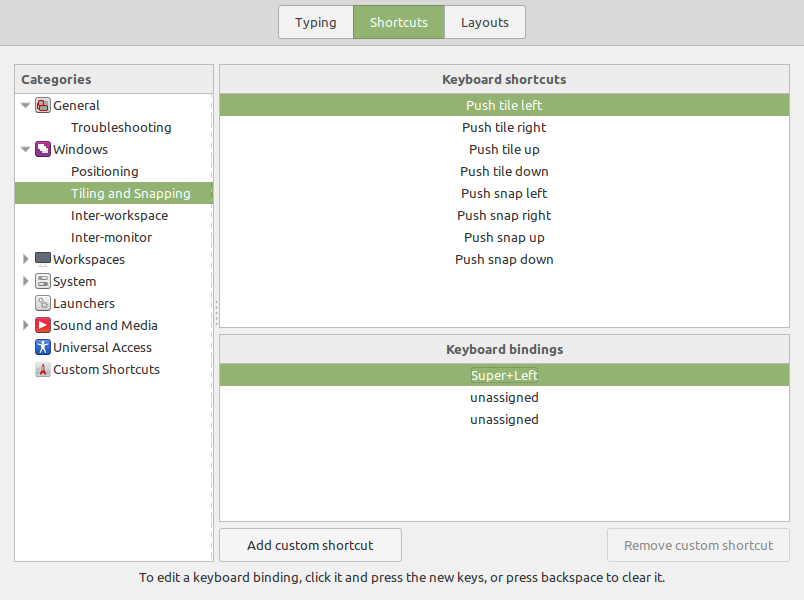
You need to turn off those shortcuts in Linux Mint system. On the
startup menu, type Keyboard and change the Super + Left to something
else. The Super here obviously means Alt key.